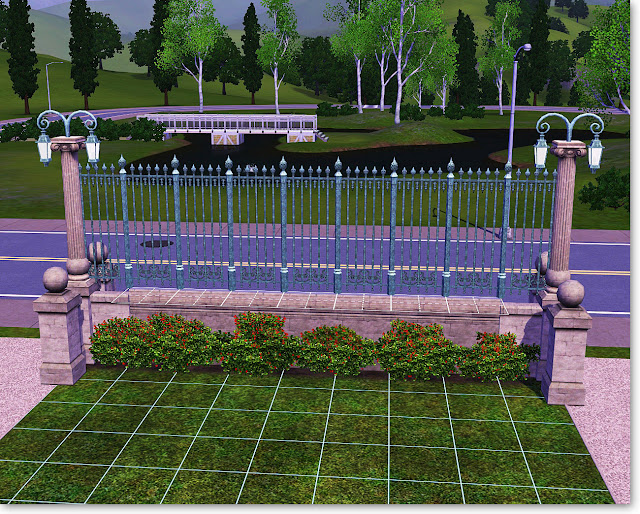
With my last post I began what I hope to be a series of explanations of how to use the "constrainfloorelevation" cheat code or CFE for short, which can be used in the Sims to go beyond the standard building capabilities of the game. For this post I want to focus on how the terrain leveling tool can be used in conjunction with the CFE cheat to change the height of walls. To keep this post practical I also included a brief explanation of how to go about creating custom fencing using CFE. You can see below what I've currently used this technique to do in my Waddesdon Manor build. All that I've done here is take a wall and lowered it to about half it's normal height and then placed fencing on top of it. You can do a lot of cool stuff with this method by combining different fences and adding in lighting and other objects.
Even though the terain leveling tool is designed to you know level terrain, with CFE turned on you also have the ability to level floor tile with it just as you would terrain. Look what happens when you level from foundation to a one tile room. Cool right? From the images below you can see that leveling from the foundation to the room lowers the height of the walls to the level of the foundation. This also works in the opposite direction so if you want a foundation that is as high as a wall then just level from the wall to the foundation.

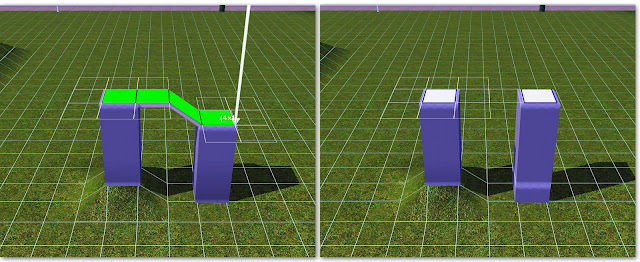
Before I go any further with this, I want to go over something that has helped me tremendously when building with CFE and that is measuring height in the Sims game. Because this is a game environment, you might wonder how measuring height is possible because there is no unit of measurement built in to the game. In other words the game doesn't tell you the height of a wall is x sim meters for example so you have to be a bit creative to come up a measuring system that works for you. The way I measure is through mouse clicks using the terrain lowering/raising tool. And to be more specific I make sure I am using the smallest radius brush with the softness slider all the way to the right, which you can see in the screenshot on the left below. The base unit of measure I use is one quick mouse click, which I've shown on the right. I say "quick" because if you hold the mouse button down too long the terrain will continue to rise, but you won't able to tell accurately by how much.

With the next two images you can see how I used this to measure the heights of a wall and foundation. If you use the terrain raising tool at the settings I've shown, by clicking 12 times with your mouse you will raise the terrain to wall height. It takes 3 clicks to reach the height of foundation. If you go back to the example where I lowered the one tile room, you'll now know that the height of the CFE lowered one tile room is 3 clicks high because I leveled from foundation.

So that's nice, but how will that actually help in building with CFE? To answer that, let's say you want a wall that is half the normal height, which you now know is 6 clicks high according to the click measuring method. You also know that foundation is 3 clicks high, but leveling from foundation to the wall will only get you to half the height you want so what do you do? The answer is quite simple really. Just put that foundation on ground that is raised 3 clicks and level like before: 3 clicks + 3 clicks = 6 clicks . You can see how I did it in the next two images. If you think about it, you could get the same thing if you dug a hole 6 clicks deep, placed another one tile room in the hole and leveled from it to the other: 12 clicks - 6 clicks = 6 clicks.

This technique also works if you wanted to make walls higher than the standard 12 clicks. In the next two images you can see how I've raised the height of the one tile room, this time again by 3 clicks thereby adding 1/4 of additional height. I did this by placing a one tile room on terrain raised by 3 clicks and leveling from it to the other making the one tile room on the right 15 clicks high in total. Literally the sky is the limit for raising wall height, but there is a limit to how much you can lower the height of a wall and that limit is 3 clicks. You could go lower in the Sims 2, but in Sims 3 it is no longer possible to the best of my knowledge.
For whatever reason you might decide one day that you would really like some length of wall to be at a height below the level of foundation. If you use the method I've gone over so far you would think that all you had to do in this case would be to dig a hole that is 1 or 2 clicks deep since you know foundation is 3 clicks high, place a section of foundation and level to the wall. However, if you try it you'll run into the situation shown in the images below. The Sims 3 game imposes a 3 click minimum height to walls so it will lower the terrain underneath the wall you want to lower to maintain that limit. I was a bit unhappy discovering this playing the Sims 3 for the first time, but how often do you think wall that is lower than 3 clicks would be useful...you'd be surprised actually.

I did promise something practical out of all this explanation so I'll quickly go over how you can use the ideas I've provided to create custom fencing that combines CFE lowered walls with the standard fences in the game. Though in actuality I've already covered how to do everything I'm about to go over, but a brief refresher can't hurt. For my custom fencing I want wall that is half normal height or 6 clicks high. Just place a section of foundation on terrain raised 3 clicks and level from the foundation to the line of wall like I did below.
Once you release the mouse button using the level tool, you'll be left with a half height wall. The next step is to add whichever fence suits your needs along with a wall covering to make your custom fence complete.
There is so much you can do with this technique it's not even funny so have fun with it.


 .
. 


